Summarising some of the more relevant points from my earlier, more generic, piece:
Light
Sunlight is best, of course, so if you're on a day trip out with the family and the weather is somewhat changeable, take full advantage of the moments when the sun's 'out' to grab some snaps of the kids and your location - because trying to do the same an hour later when clouds have obscured the sun will result in photos which are an order of magnitude less pleasing. Sun = Light = Colours. Remember that.
Dirt
Whether you own an N8 or 808, there's one common factor which can ruin every photo and video you take - fingerprints and other dirt or dust on the camera glass (it's actually scratch-resistant plastic on the N8, interestingly). A brief wipe on a tissue is all that's usually needed - try not to use a coarser, non-absorbent section of t-shirt, as this can often smear any finger grease rather than remove it.
Direction
In addition to seeking out light, you also have to bear in mind its direction, as hinted at above. I know it's a 'cliché', but most of the time you want it behind you and lighting up your subjects - leave arty silhouette and sun glare effects to the pros with their SLRs.
Having said that, bear in mind that if the sun's low in the sky and it's directly behind you, all your subjects (if they're human, at least) will be squinting rather unflatteringly, which won't make for a very natural photograph. Better to have the sun behind you at 45 degrees to the angle of shot, giving your subjects an easier time of it and giving some natural contrast to their faces. Indoors, your main source of light will be windows - as mentioned above, it's easy to suggest that your subject stand near one, but make sure you're as close to the window as they are, so that you're shooting the light falling on the subject rather than in effective silhouette around them.
Bokeh/Depth of field
How much you seek to avoid or embrace 'depth of field' effects depends on what you want. EDoF phone cameras famously use hardware and software tricks to achieve massive depth of field, eliminating any need to focus. But with the N8 and 808 PureView you will hopefully revel in the chance to take perfectly-focussed, crystal clear shots of people and things, with a slight artistic blur to the extreme foreground and background. Take this concept to its maximum and, for very close subjects, you can blur out the background almost entirely - this is the famous 'bokeh' effect.
Smooth and stabilised
Famously - anyone remember (now The Verge's) Vlad Savov's appalling first look at the N8's camera? - using a phone camera with a proper mechanical shutter button takes a modicum of skill and experience. On a standalone camera, the device is heavy enough that the extra resistance of the spring in the shutter button is trivial - on a camera phone, experience is needed to brace the phone with your left hand and right thumb, while the right index finger collects focus and then presses down smoothly and gently, without jarring the device and causing the ultimate beginner's mistake - motion blur.
In the same way as not snatching at the shutter button on your N8 or 808, you should do everything you can to keep the device still relative to the environment. After all, the sensors of the N8 and 808 are large and shutter speeds often quite fast, but you'll often be using the devices in challenging light conditions (dusk, indoors, events) and in such cases shutter speeds need to be longer, which means you need to keep the phone as still as possible. Taking a tripod with you everywhere is usually over the top(!), but stopping yourself wobbling around while taking a photo isn't always trivial - especially if you're in the middle of a field or on the beach and if it's cold or windy. Stand with your legs apart, braced against any breeze, and hold the N8/808 in two hands. My favourite tip is to use a wall or lamppost nearby, pressing your body to it or, even better, resting the body of the camera phone on it or on one side of it.
Natural
It's all very well taking posed photos of people, but the problem is that they'll always look.... posed. In addition to getting the standard posed shots at events, use the fact that you have a phone-mounted camera to get up close with subjects, get them in the viewfinder, wait for the 'posed' expression and then distract them by making them laugh ("Well, that's a dopey expression!" or similar?) and then snap that shot. 80% of the impromptu shots you take like this may will be complete rubbish (eyes closed, wierd facial contortions, etc!) The other 20% will be gems, possibly better than any of the 'pro' posed photos. Certainly, most of my favourite shots of family and friends were all taken as 'natural' photos rather than in formal poses!
All good advice then, though I stand by my claim that it's hard to take a bad photo with the 808 (camera shake aside) - the sensor and imaging electronics are just too good. I've started and abandoned two tutorials on eking out the last scraps of photo performance, simply because my 'before' and 'after' examples were basically indistinguishable. You have to go to utterly extreme lengths to show the 808's camera in a bad light (no pun intended). Though I bet Gizmodo (spit) would have a darn good try, moments before dismissing the 808 as irrelevant...

Having said that, there are extra tips I'd pass on that are mainly specific to the Nokia 808 PureView.
1. Macros - stay in Automatic, tap to focus and use some PureView zoom
On most camera phones, to shoot macro shots - flowers, objects, and so on, you switch to a dedicated 'Close-up' mode. Although the 808 has such a scene mode, it's not needed at all, since it doesn't give the lens any more focussing movement than is possible in fully 'Automatic' mode. The trick is to stay in 'Auto' mode therefore and to tap on the screen to focus.
At this point, you'll realise that the Nokia 808 camera can't focus within about 16cm from a subject - this is a limitation of the large optics and sensor, but don't give up since there's an easy workaround. To get the best ultra-macro shots, stay within the range the 808 will focus from (e.g. 20cm outwards) and then use a finger swipe up the screen (or the zoom/volume buttons) to apply a touch of PureView zoom to get you 'optically' closer. Best not to go to full zoom (as I did below with the butterfly shot), as you'll lose all oversampling benefits, so go to about 2x or so if you can.

2. Don't be afraid to use the on-screen shutter control
The 808 has a very well balanced physically shutter key and this works very well for general shots, especially outside in good light when you want to keep a firm grip on the phone. However, even the steadiest hand in the world runs the risk of a tiny bit of vertical camera movement when depressing a shutter button and, indoors and in low light, it's best to go for the safer tap-to-focus and thumb-tap on the on-screen shutter icon instead. Although this also jogs the phone slightly, the movement isn't perpendicular to the subject direction and so the effects will be much smaller. (Interestingly, it's mainly this effect that's tackled by the 'PureView phase 2' optical image stabilisation in the Nokia Lumia 920.)
3. Focussing tricks in low light
With the 808 having a large sensor, it's tempting to try to take focussed shots in outrageously light-challenged situations. Although the photo can be taken, actually focussing can be tricky, since even with the 808's rather bright LED focus assistance, subjects can sometimes be hard to 'lock on' to. Firstly, try multiple times to 'tap to focus' - I've often found that it takes several tries to lock focus when there's not much contrast to analyse on the subject. So keep trying.
The second thing to try is to find something else that's roughly at the same distance as the intended subject and yet is slightly better lit, or has better contrast/texture, and then focus on that instead, then pan round to your original subject and finally take the shot.
As a last resort, use 'Creative' mode (read all about it here) and long press on the viewfinder - you'll see a pop-up list of focussing modes. 'Hyperfocal' is a good bet for most situations, or 'Infinity' if you're trying to shoot a low light landscape (e.g. end of a sunset).
4. If you need more oversampling or more zoom, drop the resolution
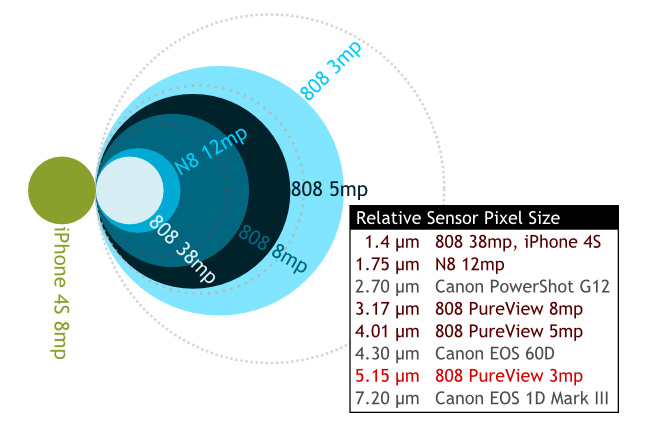
One of the unique aspects of the Nokia 808 is its massive sensor and oversampling system, whereby if you drop the output resolution you require (in Creative mode), you can get either more oversampling, as shown in this representation of the effective 'superpixel' size for the various 'Creative' resolutions:
Or, more interestingly, you can use greater degrees of PureView 'lossless zoom'. In video mode, shooting at 360p (i.e. screen resolution), you can zoom in losslessly (i.e. without artefacts) by up to 12x. In stills mode, you're looking for greater resolution, but even dropping from 5mp to 3mp you can get an extra degree of magnification out of the 808's camera, i.e. 4x zoom, which might just make all the difference.
5. Don't get so carried away with PureView zoom that you get lazy!
When you've got 'lossless' zoom it's very tempting not to bother to get closer to subjects (as you would with a traditional camera phone) and just use the zoom to do all the hard work. However, you are in fact 'losing' something - you're losing the oversampling. When at maximum zoom (normally 3x), you're using the raw 1.4 micron pixels with no 'PureView' oversampling at all. Which means your photos will look worse.
In short, if you've got a subject to take, maximise the amount of PureView oversampling by minimising the amount of PureView zoom used. It's a tradeoff, naturally. But if you can get closer to a subject then do so, just as you would with any other phone camera.
6. Stay away from 34MP/38MP resolution
Yes, we've all taken a couple of snaps at full sensor resolution in 'Creative' mode. It's a novelty. But then you have a multiple second wait while the photo is saved, you have a 15MB JPG that's a pain to edit and, most of all, you have a photo that's not anywhere near as good as it could be, with every pixel being noisy and 'raw'. In short, Nokia's onboard PureView imaging electronics do just as good (if not better) a job as you might do resampling the 38MP image down to something useable in your favourite image editor back on the desktop.
Unless you're determined to play real life 'Where's Wally?' with crowd shots at an event, best stay away from full resolution images completely.
7. Handling light extremes quickly with 'Spotlight' mode and 'Snow' mode
Although you won't often need to go into any other mode than 'Automatic', there's one particular 'Scene' mode that I use a lot. I covered this in my detailed look at Nokia 808 Scene modes, but essentially the 'Spotlight' mode is a quick way of keeping everything on automatic but also reducing the exposure a couple of stops. The intended use case is a night time event, with a brightly lit subject on an otherwise darkened stage - the auto-exposure would get this wrong, averaging out the light and the subject would be over-exposed. Hence the reduction in exposure.
My favourite alternate use for the 'Spotlight' scene mode though is when it's sunny and I'm photographing something very reflective: water, a steam engine, a bell, chrome, and so on. In these cases, the reflections of the sun get overblown in terms of exposure and detail is lost forever. Using 'Spotlight', the whole scene is darkened enough to eliminate the unpleasant overblown areas. And, if needed, extra brightening up again of the overall scene can be done later in the editor.
The same applies, in reverse, when you want to quickly over-expose by a 'stop' or so without fiddling with Creative mode. 'Snow' mode's main feature is that it allows this over-exposure. Ostensibly to cope with snow scenes in Finland(!) but also useful for a quick scene where you're forced to shoot against a very bright light source, as in the stately home scene below:

8. Buy yourself a tripod!
Although you don't need one for general snaps, do get yourself a phone cam tripod - they're not expensive these days (e.g. here). The moment you want to tackle challenging light conditions or get 'Creative', you need to know that shutter times can go up dramatically - really low light experiments can easily have a two SECOND exposure. Which means that even resting the phone on a bench or wall won't be enough - the very fact that you're holding the phone at all will introduce some movement. GET A TRIPOD.
9. The quickest snap
The whole point of camera phone photography, as opposed to using a standalone unit, is that you're ready to snap away anytime, anywhere. Grabbing the unexpected, the fortuitous, the once in a lifetime moments. Which means that speed is of the essence. On the Nokia 808 PureView, did you know that, even when keylocked/off, you can press and hold the shutter button to wake the phone, launch the Camera application and take a photo on full auto-everything?
10. Use 'Automatic' 95% of the time
The Nokia 808 PureView really isn't hard to use. Most times I try and improve what I think will be a great photo opportunity on the 808, I find that the 'Automatic' mode works just as well - Nokia did a great job with the focussing, exposure, ISO and oversampling algorithms. So relax, stay in 'Auto' and just take the photos - the phone will almost always do you proud!
No hay comentarios:
Publicar un comentario