The story so far: the Nokia 808 PureView's 41 megapixel sensor is famously optimised for taking 'pure' 5 megapixel photos (hence the name), with up to 7-to-1 pixel oversampling. There's facility for zooming in (up to 3x, in 5 megapixel mode) before shooting a photo, until you hit 1:1 pixel usage, but in most cases you still end up with a 5 megapixel image. The photo, then, is what it is. If you wanted something different that you should have taken the shot differently, etc.
Using a similar (but re-engineered) 41 megapixel sensor, the Nokia Lumia 1020 approaches computational photography slightly differently. Rather than have to choose what you want to frame or zoom up front, the entire 38MP scene is captured every time, anyway, no matter how far you think you've 'zoomed in' using the viewfinder for the 'social' 5MP 'shareable' version. Then, later, you can decide that you want a different degree of zoom or a reframing, or even pick out a completely different subject, saving each as a new 5MP image.
Both systems have advantages and disadvantages. The Nokia 808 wins through speed of capture (much less than a second shot to shot time) and through absolute 'purity' of its images, the Lumia 1020's main 'cons' are the slow shot to shot times (multiple seconds, as it has to save two images, one of which is full resolution) and the extra disk real estate (up to 20MB) needed for each 'dual capture' shot pair, while the 1020's main advantage is in more flexibility in terms of what you see and what you do with the image later.
It's this latter advantage that I wanted to (at least partially) tackle on the Symbian-running 808 PureView here.
Capturing and zooming or reframing later
I've famously said that I never shoot full resolution (34MP/38MP, depending on aspect ratio) photos on my Nokia 808 PureView, but I'm going to make an exception for this tutorial, since it's based on doing exactly that.
It's worth noting that manipulating full resolution images like this isn't as quick or as flexible as on the 1020, which is optimised especially for this - saving a 38MP shot takes well over two seconds and don't even think about 'resizing' such a photo as-is, down to 5MP - it takes an eternity. However, this isn't to say that I can't demonstrate what is possible and that we can't have some fun along the way. 'Zooming in' to lower resolution fragments is actually surprisingly easy and practical - here's what to do.
NB. Old 808 hands will know all this, of course, if this all seems too obvious then move right along.....
Here's the preparation.
- Start the Nokia 808's camera in the usual way.
- Tap on the button, top-centre ('Automatic').
- Tap on the 'Creative' tab.
- Select a custom tab to use (here 'C1', but it's up to you - whatever you select here will get remembered for future shots like this).
- Tap on 'Reset' (just in case you've played with this mode before, so let's clear any odd and experimental settings).
- Swipe down and tap on 'Full resolution'.
- Tap on '4:3' (so that you capture as much of the scene as possible).
- Tap on 'Superfine' (so that as much detail as possible from the image is saved into the JPG).
- Tap on 'Vivid' (if you like, but it will bring out colours better than the 808's default neutral colour palettes).
Leave everything else on default settings unless you have a particular reason for fiddling with something!
With everything in place, head out to shoot an interesting scene:

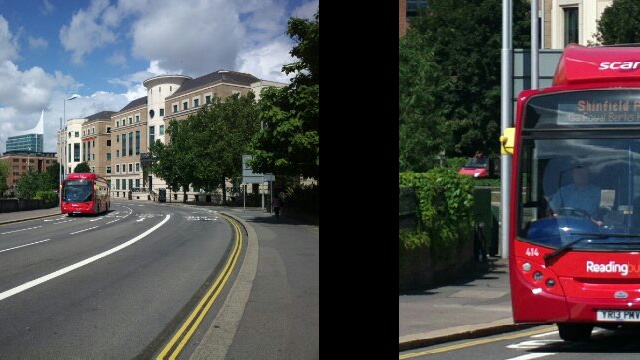
Plenty going on, then. In a real world situation, you'd be tempted to use some PureView 'zoom' to highlight a particular subject, but that's the exact opposite approach to the one demonstrated here, so resist - just take the whole scene.
All images here are screengrabs from the Nokia 808, by the way, so that you can see exactly what I see on the phone.
- Having taken a shot, pick a subject from the scene, e.g. a nice red bus here, and double tap on it.
- Now double tap again - you should now have a pretty good view of the subject, one that might be worth saving?
- Single tap on the screen, to bring up the editing controls.
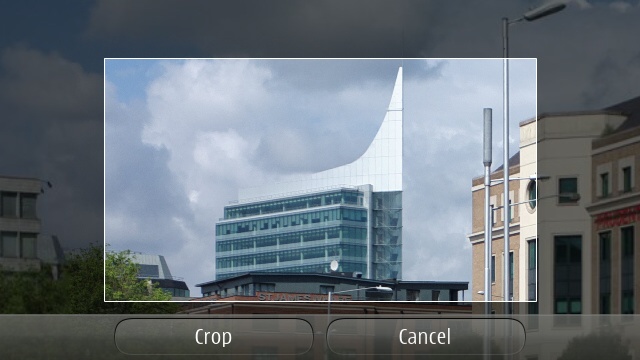
- Tap on the 'crop' icon (a rough square) and your highlighted subject/detail wil be shown within a rectangular frame.

- At this point you'll almost certainly want to adjust the framing slightly, so use multi-touch pinch/splay to adjust the exact degree of zoom/crop.
- When you're happy with what's shown inside the white rectangle, tap on the 'Crop' button.
You now have a (much lower) megapixel image saved, but don't worry, the original 38MP JPG is still there, as you can verify:
- Swipe to the right (i.e. pan the view left) and you'll see the full scene again.

- Double tap (once or twice) to highlight a different subject in the scene, e.g. Reading's famous 'Blade'

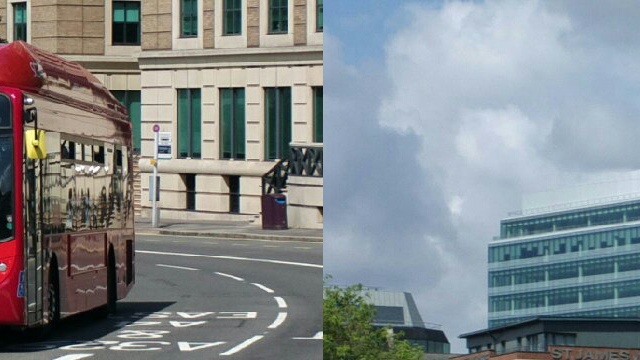
- Repeat the steps above to crop, adjust the crop and save.
And so on. As on the Lumia 1020, with a busy enough and an interesting enough scene, it's quite possible to pull two, three or many more photos (at varying resolutions) all from the one original. In other words, shoot first and zoom later, exactly as on the Windows Phone 8 device.

Swiping between post-zoomed/post-cropped multimegapixel images...
The main inflexibility here, of course, is that there's no accompanying 5MP already-downsampled version, pre-prepared in case you decide not to zoom/crop in but to use the overall scene instead. Which means you've either got to upload the full 10MB+ 38MP image to wherever you want to use the photo or else use 'Options'/tools/'Resize' and then set an output size, followed by a lengthy 30 second 'saving' operation. Either way isn't ideal, which is why the Lumia 1020's 'dual capture' system is so clever, if you think about it. You get the advantages of what we're attempting above, plus instant sharing of the whole scene without any time consuming downsampling.
I should also note that cropping into a Nokia 808 38MP image and saving/downsampling isn't likely to produce results as good as going the same thing on the 1020 - the latter is better optimised for this procedure, plus it's better geared to working down at the raw pixel level. Whereas the 808's non-BSI pixels are arguably noisier, not least because the 808's engineers were optimising everything around the fact that raw pixel data would be oversampled to some degree. 'Creative' mode, on the 808, was seen as something for experts to play around with, whereas on the Lumia 1020, almost every photo that's taken by every user will be 'dual capture' and with full 'zoom/crop later' facilities available - and used.
But, those caveats aside, at least we've demonstrated that similar techniques can also be used on the older, Symbian-powered device. Perhaps not quite as practical on the 808, but do give the concept a thought next time you're at a country house, sporting event or town celebration - any scenes that you might want to explore in more detail later on, at your leisure.
Comments welcome if you've found this feature helpful. Or if you, in fact, have been doing this all along. Any particular examples of success?
No hay comentarios:
Publicar un comentario